Corrupting a ZFS File on Purpose
Most of the time, the whole point of ZFS is that your data does not get corrupted. But during development you sometimes need the opposite: a controlled, reproducible corruption, so you can watch self-healing kick in, see what a scrub reports, or just understand how a file maps onto the physical disk. There is no better exercise than breaking one byte on purpose and seeing ZFS struggling.
The safe rule is simple: do this only on throwaway pools backed by throwaway files. Pointing these commands at a real disk would be less of a lesson and more of a confession.
This is the story of doing exactly that on Linux, the lazy way and the educational way.
The lazy way
If you just want a corrupted file and you do not care how it happened, ZFS has a tool for that.
After creating a file on a ZFS filesystem, zinject will cause for data blocks to come back with a checksum error:
# zinject -t data -e checksum -a /tmp/zfs-blog-flow/single-mnt/file.bin
Added handler 1 with the following properties:
  pool: zblog1
objset: 54
object: 3
  type: 0
 level: 0
 range: all
  dvas: 0x0
You can list the active handlers:
# zinject
 ID  POOL             OBJSET  OBJECT  TYPE      LVL  DVAs  RANGE
---  ---------------  ------  ------  --------  ---  ----  ---------------
  1  zblog1           54      3       -         0    0x00  all
And clear them again when you are done:
# zinject -c all
removed all registered handlers

# zinject
No handlers registered.
Run 'zinject -h' for usage information.
That is it.
zinject injects simulated corruption into a live pool
It is a great tool, heavily used in the ZFS test suite.
It is also completely unsatisfying if what you actually want is to understand where the bytes live. For that, we have to do it by hand.
A pool made of files
I do not want to corrupt a real disk.
Not for moral reasons. I just don't have one lying around.
Yes, I could use a VM with a virtual drive, but plain files are simply easier for demonstrating the idea.
So the first step is to build pools out of plain files under /tmp/zfs-blog-flow.
Every "disk" is then a file I can open with dd and a hex editor, which is the entire trick.
$ mkdir -p /tmp/zfs-blog-flow/single-mnt /tmp/zfs-blog-flow/raidz-mnt
$ cd /tmp/zfs-blog-flow
$ truncate -s 512M single.img
$ truncate -s 512M r1.img
$ truncate -s 512M r2.img
$ truncate -s 512M r3.img
$ truncate -s 512M r4.img
From here on I work from inside /tmp/zfs-blog-flow, so the backing files are just single.img, r1.img, and so on.
I will build two pools, because they fail in different ways. First a single-vdev pool, with no redundancy at all:
# zpool create -f -O atime=off \
    -O mountpoint=/tmp/zfs-blog-flow/single-mnt \
    zblog1 /tmp/zfs-blog-flow/single.img
And then a four-file RAIDZ2 pool, with parity:
# zpool create -f -O atime=off \
    -O mountpoint=/tmp/zfs-blog-flow/raidz-mnt \
    zblogR raidz2 \
    /tmp/zfs-blog-flow/r1.img \
    /tmp/zfs-blog-flow/r2.img \
    /tmp/zfs-blog-flow/r3.img \
    /tmp/zfs-blog-flow/r4.img
Both come up online:
# zpool status zblog1 zblogR
  pool: zblog1
 state: ONLINE
config:

        NAME                             STATE     READ WRITE CKSUM
        zblog1                           ONLINE       0     0     0
          /tmp/zfs-blog-flow/single.img  ONLINE       0     0     0

errors: No known data errors

  pool: zblogR
 state: ONLINE
config:

        NAME                           STATE     READ WRITE CKSUM
        zblogR                         ONLINE       0     0     0
          raidz2-0                     ONLINE       0     0     0
            /tmp/zfs-blog-flow/r1.img  ONLINE       0     0     0
            /tmp/zfs-blog-flow/r2.img  ONLINE       0     0     0
            /tmp/zfs-blog-flow/r3.img  ONLINE       0     0     0
            /tmp/zfs-blog-flow/r4.img  ONLINE       0     0     0

errors: No known data errors
One habit is worth remembering, because file-backed pools are not where zpool looks by default.
To let an import find a pool sitting in a plain directory, point it at that directory:
$ zpool import -d .
We will need that later, when the pool is exported and we are corrupting its backing files behind its back.
Following one file down to the hardware
Start with the single-vdev pool. Write a file with an easy-to-recognize pattern, and let us go find it:
$ yes 'SINGLE-ZFS-CORRUPTION-DEMO-BLOCK' | head -c 1M > single-mnt/file.bin
$ sync
Get its inode, size, and block usage:
$ stat -c 'path=%n inode=%i size=%s blocks512=%b' single-mnt/file.bin
path=single-mnt/file.bin inode=2 size=1048576 blocks512=21
A 1 MiB file, 21 sectors on disk. Noted.
Now hand that object number to zdb and ask it to describe the object in detail:
# zdb -ddddd zblog1/ 2
Dataset zblog1 [ZPL], ID 54, cr_txg 1, 34K, 7 objects, rootbp
    DVA[0]=<0:1d400:200> [L0 DMU objset] fletcher4 lz4 ...
    size=1000L/200P birth=14L/14P fill=7 cksum=...

    Object  lvl   iblk   dblk  dsize  dnsize  lsize   %full  type
         2    2   128K   128K    10K     512     1M  100.00  ZFS plain file
                                               176   bonus  System attributes
        dnode flags: USED_BYTES USERUSED_ACCOUNTED USEROBJUSED_ACCOUNTED
        dnode maxblkid: 7
        path    /file.bin
        uid     0
        gid     0
        atime   Thu Jun  4 23:46:26 2026
        mtime   Thu Jun  4 23:46:34 2026
        ctime   Thu Jun  4 23:46:34 2026
        crtime  Thu Jun  4 23:46:26 2026
        gen     12
        mode    100664
        size    1048576
        parent  34
        links   1
        pflags  840800000004
        projid  0
Indirect blocks:
               0 L1  0:1ba00:400 20000L/400P F=8 B=14/14 cksum=...
               0  L0 0:19a00:400 20000L/400P F=1 B=14/14 cksum=...
           20000  L0 0:19e00:400 20000L/400P F=1 B=14/14 cksum=...
           40000  L0 0:1a200:400 20000L/400P F=1 B=14/14 cksum=...
A warning that cost me some confusion: that argument is a dataset, not a pool.
If you pass just the pool name - zblog1 - you are inspecting the object inside the pool's top-level object set, not inside your filesystem, and you will happily read the wrong numbers for a while.
To look inside the root dataset of the zblog1 pool, use zblog1/.
There is a shortcut that does the dataset bookkeeping for you and looks the file up by path:
$ zdb -O zblog1 file.bin -vvvv
Either way, what we are hunting for is the block pointer, and inside it, the DVA.
What a DVA actually says
DVA stands for Data Virtual Address, and it is ZFS's way of saying "this block lives here". Each DVA carries a vdev ID and an offset into that vdev. The first level-0 block from the dump above is:
0 L0 0:19a00:400 20000L/400P F=1 B=14/14 cksum=...
Decoded, that line says:
0beforeL0- the offset of this block within the file.L0- a level-0 block, meaning actual data and not more metadata.0:19a00:400- the DVA: vdev0, byte offset0x19a00into that vdev, and0x400bytes on disk.20000L/400P- the logical size, then the physical size (in hex, so 0x20000 = 128 KiB).F=1- there is real data here.B=14- the transaction group that created it.
The offset is the interesting part, and it has a catch.
The DVA offset does not count from the very start of the disk.
ZFS keeps the first 4 MiB of every disk for itself: two copies of the vdev label and a boot block.
The offset is measured after that reserved area, so to find the real byte on the file you add 0x400000 and convert to sectors:
physical byte offset = 0x400000 + DVA offset
sector               = physical byte offset / 512
For this block:
0x400000 + 0x19a00 = 0x419a00
0x419a00 / 512     = 8397
So sector 8397 of single.img should hold the start of my block.
Let us check, straight off the backing file:
$ dd if=single.img bs=512 skip=8397 count=2 status=none | hexdump -C | head
00000000  00 00 02 2d ff 12 53 49  4e 47 4c 45 2d 5a 46 53  |...-..SINGLE-ZFS|
00000010  2d 43 4f 52 52 55 50 54  49 4f 4e 2d 44 45 4d 4f  |-CORRUPTION-DEMO|
00000020  2d 42 4c 4f 43 4b 0a 21  00 ff ff ff ff ff ff ff  |-BLOCK.!........|
00000030  ff ff ff ff ff ff ff ff  ff ff ff ff ff ff ff ff  |................|
*
00000220  ff ff ff ff ff ff ff ff  ff ff c8 50 4d 4f 2d 42  |...........PMO-B|
00000230  4c 00 00 00 00 00 00 00  00 00 00 00 00 00 00 00  |L...............|
00000240  00 00 00 00 00 00 00 00  00 00 00 00 00 00 00 00  |................|
*
00000400
My pattern is in there - SINGLE-ZFS-CORRUPTION-DEMO-BLOCK - so the address arithmetic is right.
But it is wrapped in junk, the text breaks off after one line, and the block is 0x400 bytes instead of the clean 128 KiB I was picturing.
The DVA was correct, the sector math was correct, the dd command was correct.
The right place, the wrong mental model.
The compression trap
The block count had been trying to tell me this the whole time.
A 1 MiB file does not fit in 21 sectors unless something is squeezing it, and zdb had been saying so in plain sight: 20000L/400P means 128 KiB logical, 1 KiB physical.
The block is compressed.
What is on the disk is the compressed image, so of course it does not look like my repeated string.
I forgot to turn compression off, and then I blamed ZFS for playing with my data. Compression off, then, before any of this offset arithmetic - and note that changing the property does not rewrite existing blocks, so the file has to be written again afterwards:
# zfs set compression=off zblog1
# zfs get -H -o name,property,value compression zblog1
zblog1  compression     off
Recreate the file:
$ rm single-mnt/file.bin
$ yes 'SINGLE-ZFS-CORRUPTION-DEMO-BLOCK' | head -c 1M > single-mnt/file.bin
$ sync
The path form of zdb is convenient here, because it reports the new object number for us:
# zdb -O zblog1 file.bin -vvvv

    obj=3 dataset=zblog1 path=/file.bin type=19 bonustype=44

    Object  lvl   iblk   dblk  dsize  dnsize  lsize   %full  type
         3    2   128K   128K  1.00M     512     1M  100.00  ZFS plain file
                                               176   bonus  System attributes
        dnode flags: USED_BYTES USERUSED_ACCOUNTED USEROBJUSED_ACCOUNTED
        dnode maxblkid: 7
        uid     0
        gid     0
        atime   Thu Jun  4 23:47:09 2026
        mtime   Thu Jun  4 23:47:09 2026
        ctime   Thu Jun  4 23:47:09 2026
        crtime  Thu Jun  4 23:47:09 2026
        gen     22
        mode    100664
        size    1048576
        parent  34
        links   1
        pflags  840800000004
        projid  0
Indirect blocks:
               0 L1  0:469e00:400 20000L/400P F=8 B=22/22 cksum=...
               0  L0 0:369e00:20000 20000L/20000P F=1 B=22/22 cksum=...
           20000  L0 0:389e00:20000 20000L/20000P F=1 B=22/22 cksum=...
           40000  L0 0:3a9e00:20000 20000L/20000P F=1 B=22/22 cksum=...
Look at the physical size now: 20000L/20000P.
Logical equals physical, nothing is compressed, and the first data block sits at DVA 0:369e00:20000.
Same math as before:
0x400000 + 0x369e00 = 0x769e00
0x769e00 / 512      = 15183
And read the backing file again:
$ dd if=single.img bs=512 skip=15183 count=1 status=none | hexdump -C | head
00000000  53 49 4e 47 4c 45 2d 5a  46 53 2d 43 4f 52 52 55  |SINGLE-ZFS-CORRU|
00000010  50 54 49 4f 4e 2d 44 45  4d 4f 2d 42 4c 4f 43 4b  |PTION-DEMO-BLOCK|
00000020  0a 53 49 4e 47 4c 45 2d  5a 46 53 2d 43 4f 52 52  |.SINGLE-ZFS-CORR|
00000030  55 50 54 49 4f 4e 2d 44  45 4d 4f 2d 42 4c 4f 43  |UPTION-DEMO-BLOC|
00000040  4b 0a 53 49 4e 47 4c 45  2d 5a 46 53 2d 43 4f 52  |K.SINGLE-ZFS-COR|
00000050  52 55 50 54 49 4f 4e 2d  44 45 4d 4f 2d 42 4c 4f  |RUPTION-DEMO-BLO|
00000060  43 4b 0a 53 49 4e 47 4c  45 2d 5a 46 53 2d 43 4f  |CK.SINGLE-ZFS-CO|
00000070  52 52 55 50 54 49 4f 4e  2d 44 45 4d 4f 2d 42 4c  |RRUPTION-DEMO-BL|
00000080  4f 43 4b 0a 53 49 4e 47  4c 45 2d 5a 46 53 2d 43  |OCK.SINGLE-ZFS-C|
00000090  4f 52 52 55 50 54 49 4f  4e 2d 44 45 4d 4f 2d 42  |ORRUPTION-DEMO-B|
That was a long journey:
- file path to object
- object to block pointer
- block pointer to DVA
- DVA to a sector in a file pretending to be a disk
zdb can also read the block for you and save the manual conversion, if you trust it more than dd:
# zdb -R zblog1 0:369e00:20000:r
The suffix flags pick what zdb does with the block - r dumps it raw, d decompresses, c checksums, i follows it as an indirect block, and so on.
It is the faster path, but for learning the layout I still prefer the dd step: it forces you to know which address space you are standing in.
The actual corruption
Everything above was reconnaissance.
The corruption itself is one line.
Exporting the pool first keeps us from fighting the live ARC; importing from the directory afterward is why we learned that -d flag earlier:
# zpool export zblog1
$ printf 'BAD-SINGLE\n' |
    dd of=single.img bs=512 seek=15183 count=1 conv=notrunc status=none
# zpool import -d . zblog1
# zpool scrub zblog1
conv=notrunc is the important flag - without it dd would cheerfully truncate the whole image file instead of overwriting one sector in place.
The checksum ZFS stored no longer matches the bytes on disk, and a scrub finds it immediately:
# zpool status -v zblog1
  pool: zblog1
 state: ONLINE
status: One or more devices has experienced an error resulting in data
        corruption.  Applications may be affected.
action: Restore the file in question if possible.  Otherwise restore the
        entire pool from backup.
   see: https://openzfs.github.io/openzfs-docs/msg/ZFS-8000-8A
  scan: scrub repaired 0B in 00:00:00 with 1 errors on Thu Jun  4 23:48:37 2026
config:

        NAME                             STATE     READ WRITE CKSUM
        zblog1                           ONLINE       0     0     0
          /tmp/zfs-blog-flow/single.img  ONLINE       0     0     2

errors: Permanent errors have been detected in the following files:

        /tmp/zfs-blog-flow/single-mnt/file.bin
This is the unrecoverable case. ZFS knows the device stores a broken data, but with only one copy it cannot reconstruct the data. It can detect, but it cannot heal. To watch the healing, we need parity.
Doing the same thing on RAIDZ2
Now repeat the whole exercise on the RAIDZ2 pool. This time I disable compression before writing the file, because we have already been bitten once:
# zfs set compression=off zblogR
$ yes 'RAIDZ2-ZFS-CORRUPTION-DEMO-BLOCK' | head -c 1M > raidz-mnt/file.bin
$ sync

$ stat -c 'path=%n inode=%i size=%s blocks512=%b' raidz-mnt/file.bin
path=raidz-mnt/file.bin inode=2 size=1048576 blocks512=2051
zdb shows the first level-0 data block:
# zdb -O zblogR file.bin -vvvv | sed -n '1,40p'
obj=2 dataset=zblogR path=/file.bin type=19 bonustype=44

    Object  lvl   iblk   dblk  dsize  dnsize  lsize   %full  type
         2    2   128K   128K  1.00M     512     1M  100.00  ZFS plain file
                                               176   bonus  System attributes
        dnode maxblkid: 7
        size    1048576
        parent  34
        links   1
Indirect blocks:
               0 L1  0:23c400:c00 20000L/400P F=8 B=31/31 cksum=...
               0  L0 0:3b400:40200 20000L/20000P F=1 B=31/31 cksum=...
           20000  L0 0:7b600:40200 20000L/20000P F=1 B=31/31 cksum=...
           40000  L0 0:bb800:40200 20000L/20000P F=1 B=31/31 cksum=...
Here the simple 0x400000 + offset trick is not enough.
That DVA offset, 0x3b400, is an offset into the top-level raidz vdev, not a byte offset into any one child file.
raidz chops each block into sectors and lays them across the children as a stripe of data and parity columns, so to find a byte on a real disk we have to replay that mapping by hand.
The mapping lives in vdev_raidz_map_alloc() in module/zfs/vdev_raidz.c, and it is only a handful of integer operations.
These are its inputs for our pool:
ashift   = 9        # log2(512); a sector is 512 bytes
dcols    = 4        # children in the raidz vdev (r1..r4)
nparity  = 2        # RAIDZ2 -> 2 parity columns per stripe
dva_off  = 0x3b400  # DVA offset, in bytes, into the raidz vdev
psize    = 0x20000  # physical block size, from 20000L/20000P
Everything inside raidz is counted in sectors, so the first step is to turn those byte counts into sector counts.
b is the sector the block starts at inside the raidz vdev, and s is how many sectors long it is:
b = dva_off >> ashift   = 0x3b400 >> 9 = 474   # start sector in raidz
s = psize   >> ashift   = 0x20000 >> 9 = 256   # block length, in sectors
A stripe does not have to start on the first child.
f is the column it starts on, and o is the byte offset every child is read from; both come from dividing that start sector by the number of children:
f = b % dcols             = 474 % 4 = 2        # first column, 0-based
o = (b / dcols) << ashift  = 118 << 9 = 0xec00 # base offset per child
(b, s, f, and o are the actual variable names in the source, so you can read along with the code.)
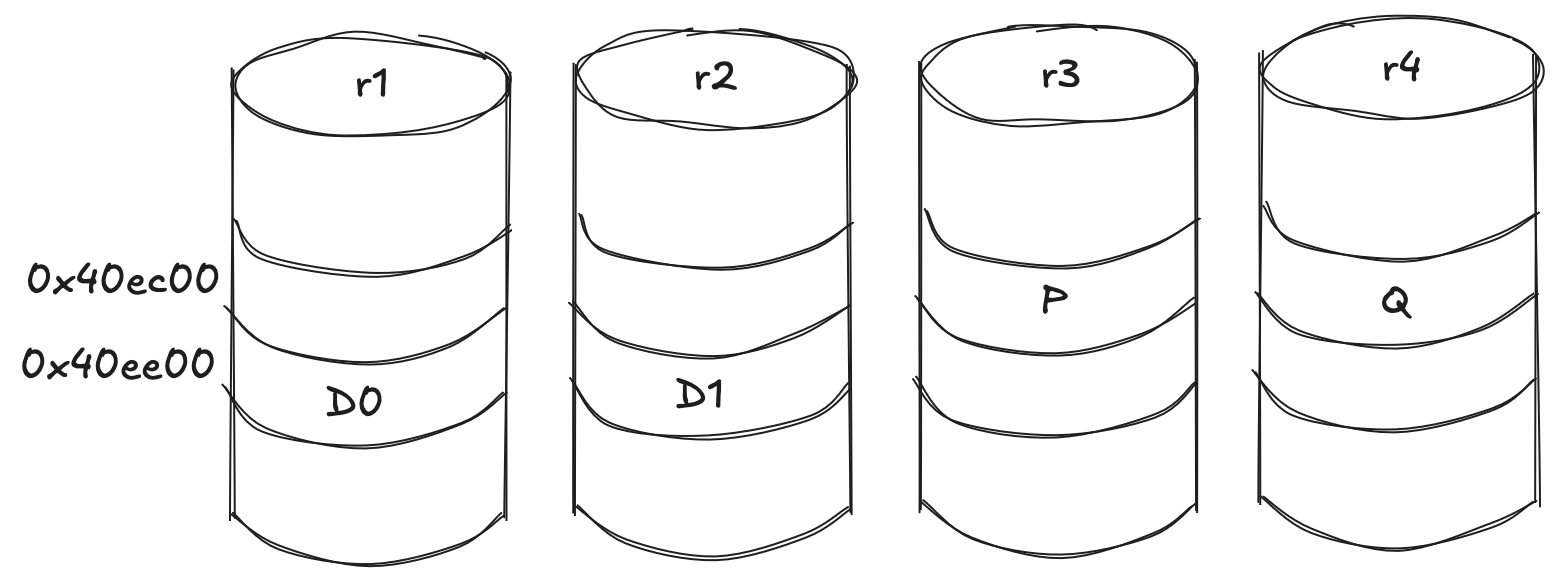
Children are numbered from zero in creation order - r1=0, r2=1, r3=2, r4=3 - so f = 2 means this stripe starts on r3.img.
Of the four columns, the first nparity are parity and the rest are data, so the stripe runs P, Q, data, data, starting at column f and wrapping around the end of the row:
column  role        child idx  file    placement
0       parity (P)  2          r3.img  f
1       parity (Q)  3          r4.img  f+1
2       data        0          r1.img  f+2, wraps r4 -> r1
3       data        1          r2.img  f+3, wraps -> r2
The wrap is the one subtlety, and it is exactly what I got wrong the first time.
When a column runs off the end of the children, it continues on the first child but one sector further in - the source does coff += 1 << ashift for exactly those wrapped columns.
So the two parity columns stay at o = 0xec00, while the two data columns, which wrapped, land one sector later at 0xee00.
Add the 4 MiB of front matter to each child offset and convert to sectors:
column  file    child off  byte off          sector
P       r3.img  0xec00     0x400000+0xec00   8310
Q       r4.img  0xec00     0x400000+0xec00   8310
data 0  r1.img  0xee00     0x400000+0xee00   8311
data 1  r2.img  0xee00     0x400000+0xee00   8311
Each data column is q = s / (dcols - nparity) = 256 / 2 = 128 sectors long.
So the block's 128 KiB of data is split into two 64 KiB chunks: 128 sectors on r1 starting at 8311, then 128 sectors on r2, with the two parity columns guarding them.
The data columns hold recognizable file bytes:
$ dd if=r1.img bs=512 skip=8311 count=1 status=none | hexdump -C | head
00000000  52 41 49 44 5a 32 2d 5a  46 53 2d 43 4f 52 52 55  |RAIDZ2-ZFS-CORRU|
00000010  50 54 49 4f 4e 2d 44 45  4d 4f 2d 42 4c 4f 43 4b  |PTION-DEMO-BLOCK|
00000020  0a 52 41 49 44 5a 32 2d  5a 46 53 2d 43 4f 52 52  |.RAIDZ2-ZFS-CORR|
00000030  55 50 54 49 4f 4e 2d 44  45 4d 4f 2d 42 4c 4f 43  |UPTION-DEMO-BLOC|

$ dd if=r2.img bs=512 skip=8311 count=1 status=none | hexdump -C | head
00000000  4b 0a 52 41 49 44 5a 32  2d 5a 46 53 2d 43 4f 52  |K.RAIDZ2-ZFS-COR|
00000010  52 55 50 54 49 4f 4e 2d  44 45 4d 4f 2d 42 4c 4f  |RUPTION-DEMO-BLO|
00000020  43 4b 0a 52 41 49 44 5a  32 2d 5a 46 53 2d 43 4f  |CK.RAIDZ2-ZFS-CO|
00000030  52 52 55 50 54 49 4f 4e  2d 44 45 4d 4f 2d 42 4c  |RRUPTION-DEMO-BL|
The parity columns do not have to look like anything, because they are parity.
Read the P column on r3 at its sector, 8310, and there is nothing recognizable - just noise:
$ dd if=r3.img bs=512 skip=8310 count=1 status=none | hexdump -C | head
00000000  19 4b 1b 05 13 76 77 68  6b 09 6b 10 62 11 1d 07  |.K...vwhk.k.b...|
00000010  02 01 19 1b 07 62 0a 68  09 0a 60 0d 61 0d 0f 04  |.....b.h..`.a...|
The Q column on r4 sits at the same sector, 8310, and looks just as random.
Now corrupt exactly one data column, again with the pool exported:
# zpool export zblogR
$ printf 'BAD-RAIDZ2\n' | \
    dd of=r1.img bs=512 seek=8311 count=1 conv=notrunc status=none
# zpool import -d . zblogR
# zpool scrub zblogR
And this time, redundancy earns its keep:
# zpool status zblogR
  pool: zblogR
 state: ONLINE
status: One or more devices has experienced an unrecoverable error.  An
        attempt was made to correct the error.  Applications are unaffected.
action: Determine if the device needs to be replaced, and clear the errors
        using 'zpool clear' or replace the device with 'zpool replace'.
   see: https://openzfs.github.io/openzfs-docs/msg/ZFS-8000-9P
  scan: scrub repaired 64K in 00:00:00 with 0 errors on Thu Jun  4 23:48:48 2026
config:

        NAME                           STATE     READ WRITE CKSUM
        zblogR                         ONLINE       0     0     0
          raidz2-0                     ONLINE       0     0     0
            /tmp/zfs-blog-flow/r1.img  ONLINE       0     0     1
            /tmp/zfs-blog-flow/r2.img  ONLINE       0     0     0
            /tmp/zfs-blog-flow/r3.img  ONLINE       0     0     0
            /tmp/zfs-blog-flow/r4.img  ONLINE       0     0     0

errors: No known data errors
One checksum error, all on r1.img and no one else.
The data is still good, ZFS rewrote the bad sector from parity, and zpool status shows exactly which disk was wrong.
This is the whole point of the exercise: not to break the file, but to give ZFS something to catch.
Why bother
zinject would have produced a corrupted file in one command, and most days that is exactly what you want.
But it tells you nothing about the road from a file to a byte on a platter.
Doing it the long way - inode, dnode, block pointer, DVA, the 4 MiB of reserved front matter, the compression you forgot to turn off, the raidz columns you had to unmap - is how that road stops being abstract.
That road matters when the bug is in the place where abstractions meet hardware.
And there is a small, petty satisfaction in corrupting a file so precisely that ZFS knows the exact moment to be unhappy about it.